9.6 ColorQuad
Generates a colored rectangle. It is useful as a building block in other compositions such as creating a colored border around an image. This effect takes no inputs - i.e. it can be used directly as a layer in a layers expression.
| Parameters |
| Default |
| Range |
| Description |
| HexColor |
| 1.0 |
| 0xFFFFFFFF |
| The hex value of the color of the rectangle. Either use the "HexColor" parameter or the {a ,r ,g ,b} parameters. |
|
|
|
| ||||
| a |
| 1.0 |
| (0.0 - 1.0) |
| The alpha, or transparency value, of the color. |
|
|
|
| ||||
| r |
| 1.0 |
| (0.0 - 1.0) |
| The red component of the color. |
|
|
|
| ||||
| g |
| 1.0 |
| (0.0 - 1.0) |
| The green component of the color. |
|
|
|
| ||||
| b |
| 1.0 |
| (0.0 - 1.0) |
| The blue component of the color. |
9.6.1 Simple color border around an image
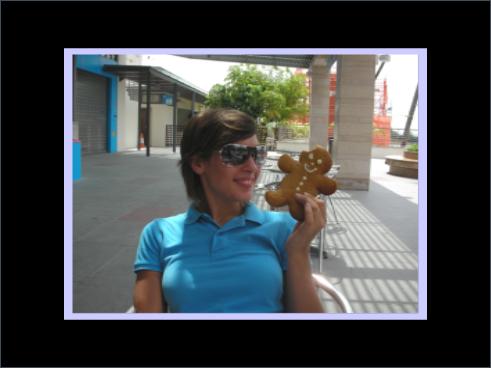
The muvee style creates a color border around the user image. See the screen shot for reference.
; muSE v2 ; ; My "Lord I'm a genius" style ; This style creates a purple border around the user image (style-parameters) (segment-durations 8.0) (define muvee-global-effect (effect-stack (effect "Perspective" (A)) (effect "CropMedia" (A)) (effect "Translate" (A) (param "z" -1.0)))) (define muvee-segment-effect (layers (A) (effect-stack (effect "Scale" (A) (param "x" 1.05) (param "y" 1.05)) (effect "ColorQuad" () (param "a" 1.0) (param "r" 0.8) (param "g" 0.8) (param "b" 1.0))) A))
Move all the user media backwards by -1.0 in the z-space. (done as a global effect )
Creates a Color Surface using the ColorQuad effect.
Scales that ColorQuad to 1.05 its original length. This is done so that the ColorQuad will be slightly bigger than the user media, giving you a color border.
Draws the input media on top of the ColorQuad. (This is achieved by the letter A that is written just before we close the last two brackets in the segment effect code chunk.)
We have introduced the concept of layers in the example. Here’s what happens, the ColorQuad effect does not take any input. But we want to display the user media in front of the ColorQuad; So we create a layers in which we have both input A ( which is the user picture ) and the ColorQuad effect. That results in the nice screen shot you see below.
You will notice the letter A all over the place. Generally it means an input data of some sort. But the input media it refers to is different depending on where it is placed. Here’s the breakdown:
(layers (A) ....) Here A refers to the user media.
A The very last A you see at the bottom of the segment effect also refers to the user media.
"Scale" (A) .... Here A refers to the ColorQuad. Consider the effect-stack as a chunk on its own. You first have a ColorQuad. And then the Scale effect is applied to that particular ColorQuad.